Are you ready to learn more about how to tie a tie?
There are various ways to tie a necktie, each creating a distinct knot. Below are instructions for tying three common knots: the Four-in-Hand knot, the Windsor knot, and the Bow tie knot.
1. Four-in-Hand Knot:
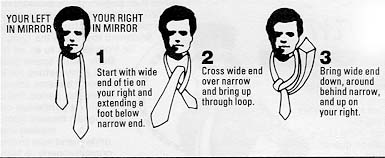
Step 1: Start with the wide end of the tie on the right and the narrow end on the left. The tip of the narrow end should rest at the midpoint of your chest.
Step 2: Cross the wide end over the narrow end.
Step 3: Bring the wide end under the narrow end.
Step 4: Pull the wide end through the loop created by the cross (from left to right).
Step 5: Hold the front of the knot loosely with one hand and pass the wide end down through the knot near your neck.
Step 6: Hold the knot and adjust by sliding it up to tighten. Pull the narrow end gently to adjust the length.
2. Windsor Knot:
Step 1: Begin with the wide end on the right and the narrow end on the left, with the narrow end slightly above your belly button.
Step 2: Cross the wide end over the narrow end, forming an X near your neck.
Step 3: Pass the wide end under the narrow end, pulling it through the loop and up.
Step 4: Bring the wide end over the knot from right to left.
Step 5: Pass the wide end through the loop between the collar and the knot, going from top to bottom.
Step 6: Adjust the knot by pulling the wide end gently and sliding it up. Ensure the knot is centered and tighten if necessary.
3. Bow Tie Knot:
Step 1: Start with the bow tie draped around your neck, with one end slightly longer than the other.
Step 2: Cross the longer end over the shorter end, forming a simple knot like tying your shoelaces.
Step 3: Loop the shorter end over the longer end, creating a bow shape.
Step 4: Fold the longer end into a bow shape by doubling it back on itself, forming the loops of the bow.
Step 5: Hold the folded longer end with one hand and the loops with the other, bringing the loops through the folded part.
Step 6: Adjust the bow and straighten the ends to your desired length.
Practice and patience are key to mastering the art of tying a necktie. Experiment with different knots and find the one that suits your style and the occasion best.
Below are additional instructions with images to help explain the tie tying techniques.
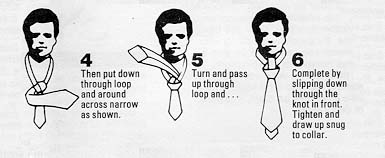
The Windsor Knot
Wide and triangular - for wide-spread shirt collars
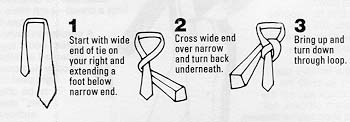
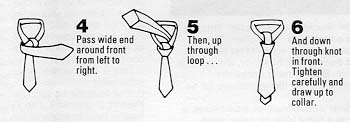
The Half-Windsor Knot
Medium symmetrical triangle - for standard shirt
collars
Next Page - How to Tie a Necktie
Special thanks to the Neckwear Association
of America for providing illustrations.
NAA, 151 Lexington Ave., 2F, New York, N.Y. 10016
Gerald Anderson
You can also visit Youtube to view videos about how to tie a tie.
You may want to learn about Silk Ties and Polyester Ties.
Thank you for using the Apparel Search website.